

Key Takeaways
- This go-to hummus and veggie sticks snack is healthy, satisfying, and easy to prepare.
- Chickpeas provide protein and fiber, while fresh veggies offer essential vitamins and hydration.
- You can make the hummus quickly with simple ingredients and no cooking required.
- Variations include adding roasted garlic, spices, or different veggies to customize flavors.
- The snack keeps well in the fridge and works for kids and various diets.
My Go-To Hummus and Veggie Sticks Snack
Okay, I have to admit—I’m totally obsessed with hummus and fresh veggie sticks right now. It’s one of those snacks that feels like a treat but actually makes me feel good afterward. No heavy regret like after a bag of chips. I stumbled on this combo years ago when I was trying to eat healthier, and it’s stuck ever since. The creamy hummus with that garlicky kick paired with crunchy veggies? Perfection.
I love how it doesn’t feel like “diet food.” The hummus has this nutty richness from the tahini, brightened up by lemon and a hit of garlic, and the veggies just snap when you bite into them. It’s satisfying without being loaded with junk.
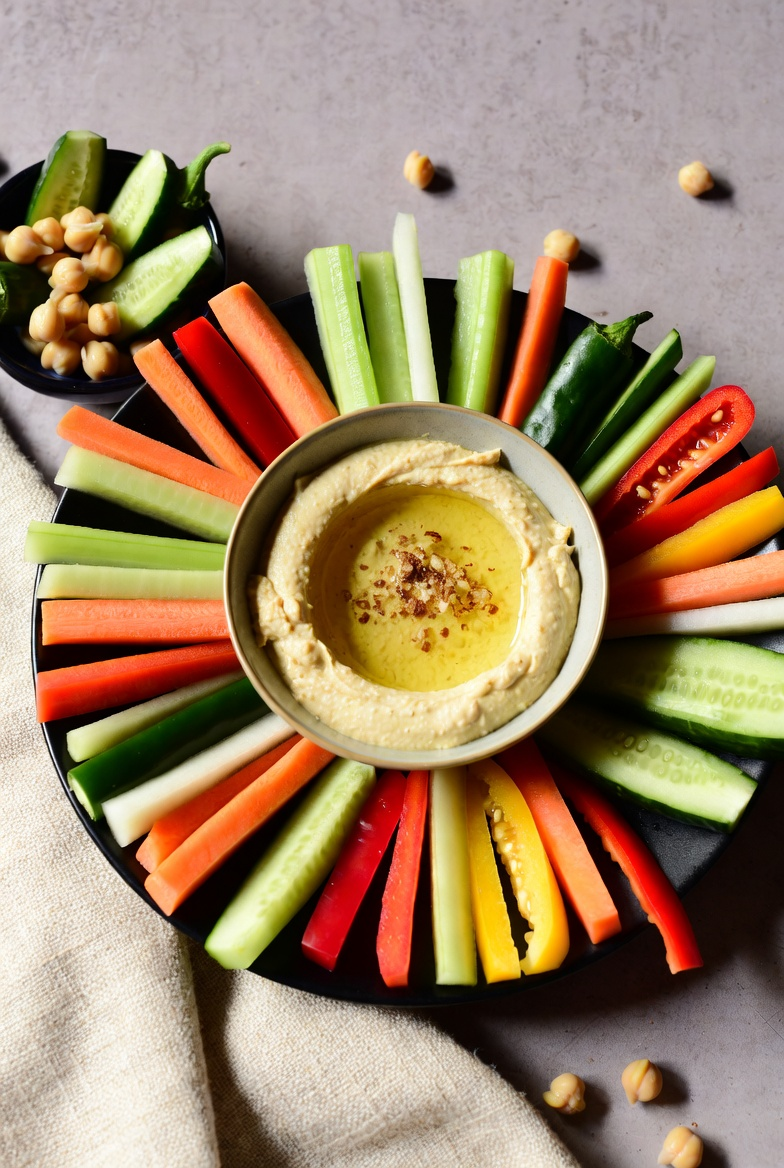
Why it’s good for you (without getting too preachy): Chickpeas are packed with protein and fiber, so it keeps me full longer. The tahini and olive oil bring in those good fats that are supposed to be kind to your heart. And the veggies—carrots for that vitamin A boost, cucumbers for hydration, celery to calm things down, and bell peppers with a ton of vitamin C. Honestly, it’s a simple way to get more nutrients in.
I make this all the time: quick energy when I’m working from home, something to pack for the kids (they actually eat the veggies this way!), or a no-fuss appetizer when people come over. It’s naturally vegan and gluten-free, so it works for pretty much everyone.
The real win? It’s so easy. No oven, no stove—just a blender and some chopping. And it’s cheap! Way better than those pricey tubs from the store that have who-knows-what in them.
My kids are picky with veggies, but dip them in hummus and they’re gone. Plus, it’s plant-based, so it feels a little better for the environment too.
It keeps well in the fridge, and I love tweaking it—sometimes I throw in roasted garlic or a pinch of cayenne for spice.
This has become my everyday snack that actually makes eating better feel effortless. It’s delicious, and I don’t have to overthink it.
You should totally make it—bet it’ll become your favorite too.
Why I Keep Making This
- Healthy without trying hard: Protein, fiber, vitamins, good fats—keeps me going.
- Super fast: No cooking, great when life’s busy.
- Doesn’t break the bank: Basic stuff I usually have anyway.
- Works for everything: Snack, lunch, party dip.
- Everyone digs it: Kids love it, fits most diets.
- That flavor and crunch—can’t beat it.
Ingredients
Hummus:
- 1 can (15 oz) chickpeas, drained and rinsed (rinse ’em to cut the salt)
- ¼ cup tahini (gives that creamy, nutty vibe)
- Juice from about 2 lemons (fresh is key for that zing)
- 2 cloves garlic, minced (I love garlic, so sometimes more)
- 2 tbsp extra-virgin olive oil
- ½ tsp ground cumin
- Salt to taste (start with ½ tsp)
- A few tbsp cold water or the chickpea liquid to thin it out
- Optional topping: paprika, parsley, extra olive oil
Veggie Sticks:
- A few carrots, peeled and cut into sticks
- Some celery stalks, cut up
- 1 cucumber, sliced into sticks
- A couple bell peppers (I like red or yellow for sweetness), cut into strips
How I Make It
- I start with the hummus: Dump the tahini and lemon juice in the blender or food processor first and whiz it for a minute—it gets all fluffy.
- Add the garlic, oil, cumin, and salt. Blend a bit more.
- Throw in half the chickpeas, blend, then the rest. Go until it’s smooth—I usually do a couple minutes.
- Drizzle in cold water a little at a time until it’s the texture I like (creamy but not runny).
- Taste it! I almost always add more lemon or a pinch of salt.
- Scoop it out, make a little swirl on top with a spoon, drizzle oil, and sprinkle paprika or parsley.
- Veggies are easy: Wash, chop into stick sizes that are good for dipping.
- That’s it—serve and enjoy!
Storage Notes
- Hummus keeps in the fridge for about a week (cover with a bit of oil on top so it doesn’t dry out).
- Cut veggies stay crunchy longer if you stick them in a container with cold water—up to a few days.
- Best to keep them separate until you’re ready to eat.
Little Tips I’ve Learned
- If you have time, peel the chickpeas (rub them in a towel)—it makes the hummus extra silky.
- Cold ingredients help it get lighter.
- Toasting the cumin a tiny bit in a pan wakes up the flavor.
- Veggie sticks in a jar of water stand up nice and stay crisp.
Variations I Try
- Roasted garlic instead of raw—milder and sweeter.
- Kick it up with cayenne or fresh jalapeño.
- Fresh herbs like basil or cilantro blended in.
- Mix in roasted red peppers for a smoky twist.
- Sometimes beets for a fun pink version (and earthy taste).
Make-Ahead Tricks
- Hummus is even better the next day—make it ahead.
- Chop veggies a day or two before.
- I love putting hummus in the bottom of a jar with veggies standing up—easy to grab from the fridge.
What Else Goes With It
- Warm pita or crackers if I want something heartier.
- Olives or nuts for a full spread.
- Great next to grilled chicken or whatever protein.
FAQs From My Kitchen
Dried chickpeas instead of canned? Sure—soak overnight, cook till soft, use about 1½ cups.
Can I freeze it? Yeah, portions freeze fine for a few months. Stir after thawing.
No tahini (allergy)? Sunflower seed butter works, or yogurt if dairy’s okay.
Hummus came out gritty? Blend longer, add more liquid, or try peeling those chickpeas.
Good for kids to help with? Totally—they can chop soft stuff or arrange the platter.
Give this a go next time you’re hungry—it’s simple and so worth it!
Hummus and Veggie Sticks: The Ultimate Healthy Snack
Ingredients
- 1 15 oz / 425g can chickpeas (garbanzo beans), drained and rinsed (reserve some liquid if needed)
- 1/4 cup 60g tahini (sesame paste)
- 1/4 cup 60ml fresh lemon juice (about 2 lemons)
- 2 garlic cloves minced
- 2 tablespoons 30ml extra-virgin olive oil (plus more for drizzling)
- 1/2 teaspoon ground cumin
- 1/2 teaspoon salt or to taste
- 2-4 tablespoons 30-60ml cold water or reserved chickpea liquid (for thinning)
- Optional: Paprika and chopped parsley for garnish
- 4 medium carrots peeled and cut into sticks
- 4 celery stalks cut into sticks
- 1 large cucumber cut into sticks
- 2 bell peppers red, yellow, or orange, seeded and cut into sticks
Method
- Prepare the hummus: In a food processor or blender, add the tahini and lemon juice first. Blend for about 1 minute until whipped and creamy. This step helps achieve a smoother texture.
- Add the minced garlic, olive oil, cumin, and salt. Process for another 30 seconds, scraping down the sides as needed.
- Add half the drained chickpeas and blend for 1 minute. Scrape down the sides, add the remaining chickpeas, and blend until thick and smooth (about 1-2 minutes).
- If the hummus is too thick, add cold water or reserved chickpea liquid 1 tablespoon at a time while blending until you reach your desired creamy consistency.
- Taste and adjust seasoning – add more lemon for tang, salt for flavor, or garlic for kick.
- Transfer the hummus to a serving bowl. Use the back of a spoon to create swirls on the surface. Drizzle with a little extra olive oil and sprinkle with paprika and chopped parsley if desired.
- Prepare the veggies: Wash all vegetables thoroughly. Peel the carrots if preferred. Cut the carrots, celery, cucumber, and bell peppers into uniform sticks (about 3-4 inches long and 1/2 inch thick) for easy dipping.
- Arrange the veggie sticks around the hummus on a platter or divide into individual portions for meal prep jars.
- Serve immediately or store in the fridge (hummus in an airtight container for up to 5 days; veggies in water to stay crisp).
Nutrition
Notes
- Meal Prep Tip: Layer hummus at the bottom of mason jars and stand veggie sticks upright on top – perfect for grab-and-go snacks that stay fresh for 3-4 days.
- Flavor Twists: Add roasted red peppers for a smoky version, fresh herbs like dill or cilantro, or a pinch of cayenne for heat. For a nuttier taste, toast the cumin first.
- Protein Boost: Top with pine nuts or serve with whole-grain pita for added substance.
- Kid-Friendly: Cut veggies into fun shapes or let kids assemble their own platters.
- Storage Hack: Keep cut celery and carrots crisp by storing sticks in a jar of water in the fridge.
- Variations: Try different veggies like broccoli florets, cherry tomatoes, or jicama for variety. For a lower-carb option, use more low-carb veggies like celery and cucumbers.
- Yuka App: I always use the Yuka app when searching for products at the grocery. I believe in always finding high quality ingredients that are risky additives free.